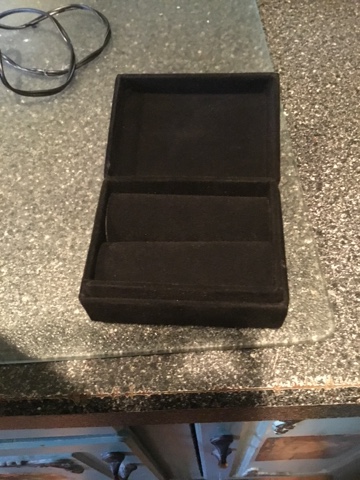
This is the black velvet box I started with.

This is what the inside looked like. You can take the inside out and replace it with a piece of cardboard on the bottom.
The first thing I did was paint the whole exterior of the box. I used flour, wood glue, and also the paint color brown I wanted to use. I mixed it all together with a Popsicle stick in a plastic throw away container which was from my Italian ice. You will need to put a Popsicle stick in the opening to keep the box from gluing down the top. Next picture I will show you the items I used.

In this picture you can see what I mixed together. I first mix glue with the paint, then I add flour just till you get a thin pudding feel. I use more glue than paint. I never measure amounts.

I like to get the straps ready that are for across the top of the trunk and the handles. These are for the top of the trunk, the next picture is for the handles. Depending on the size of your box the length will vary and width.

These are for my handles. Next I need them to look like real leather pieces. I first paint them with the same brown color minus the addition of flour and glue. Use just the paint color I use my fingers for painting them. I also keep bending them to help them look realistic.

I then take black paint and paint two lines coming up the back and over the top of the box. This also helps to see where the straps will get glued onto. This is the back.

In this picture you can see I painted across the top and down the front. I also painted lines around the outer edges of the box to help with the look and down the corners.

I then hot glued the handles to the sides.

Then I glued the top straps on to the back and across the top. Follow the lines you drew.

I only glued the strap on top to the edge of the front of the box. Do Not glue down the strap in the front area so you can open up the box. In the picture you will see two silver looking strap holders. I was tired of putting staples into the stapler and I always had small loose pieces so I used them for the strap holders. I took two staples which were together and my hammer and banged them down over the straps. Again use your line to help line everything up.

I'm showing you what you will need next for the fake nails which will be hot glued Down. I take my wire cutters and cut the button looking top off the metal things. Don't throw the metal pieces out you will need the metal pieces too. You can use any of these kind of things, they don't have to be these size. These are used for putting papers together for a report.

Here's the back with the button parts glued down with hot glue. I push them down into the glue, you have alittle bit of the metal sticking out on top it helps putting them in.

Here is across the top with them in it. As you can see I also used some of the metals pieces next to the buttons.

I found these steam trunk labels on google or yahoo I don't remember which I used. I looked up steam trunk labels images I liked these ones which I printed out.

I used mod podge to glue them down into place. I also painted on a layer of mod podge all over the whole box to give it a nice leather shine. Don't worry about the white glue it dries clear.

Here's what it looked like all covered with mod podge.

I figured I would show you another one I did that the mod podge is dry already. Get creative, this box can be used for so many things now. A gift to someone special, an engagement ring box makes a new way to ask that someone special to marry you. Use your imagination. Send one to someone in the service and put something in it let them know home is just a trip away and that you are thinking of them. Put some pictures in it of the family, send it on a trip. Unique idea. All I ask is if you use my idea give me credit showing you how to make a memory.
