Ad sense auto

Google analytics

Thursday, August 27, 2015

Princess bedroom made from a candle holder


This is what this project looks like when it's done.


This was the candle holder I started out with.


The first thing I did was cut a piece of styrofoam to fit the bottom, then I painted it brown to match the wooden floor I'm installing.


I had this one window from one of my other dollhouses.  I made a copy of this window on the copier machine, I made two copies for two windows.


Here's what the copy looked like.  I then took an exacto knife and cut out the windows and also cut around the window.


I used a piece of scrapbook paper that I wanted to use for wallpaper and used the inside area of the wooden window for a template to cut out a window opening.


I then glued the photo of the window that I made the copy of that I cut out the window sections and glued it over the window opening.  This is what it looks like.  I cut three pieces of the scrap booking paper to fit three sides of the candle holder glass.  The back wall is a solid paper and the two sides have windows.


You can see in this photo one of the window walls and the back wall. Make sure you use the mod podge it dries clear.


In this picture you can see the other wall.


I then cut some wood for the corners to make them look finished off.  I also glued down a wood floor.  This wood is from a wood placemat.


I then took Popsicle sticks and made wainscoting for the bottom of the walls, and put Popsicle sticks around the top of the wainscoting.


This is the other wall.


These are the curtains I made for over top of the windows.  In one of my other blogs I showed how to make the curtains and how I used cut off pieces off a chess pawn piece for the ends of the rods.


I made a bed out of foam board and pieces off a crown I bought at the dollar store for decoration.


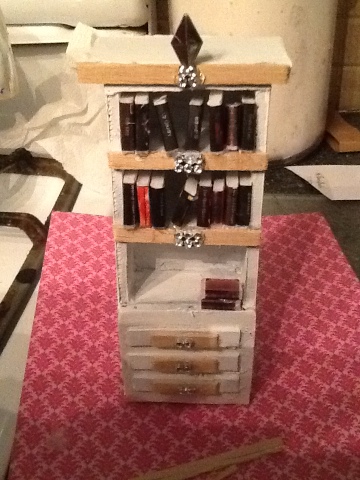
I also made this bookcase out of foam board.  I made the books out of foam board with minature book covers glued onto the foam board.  


I added a princess figurine and a little ornament above the bed.


This is another view of the room.


Another view.


I took the metal ring off the top of the candle holder and drilled a hole in the top big enough to fit the solar light.  You just need it big enough for the light bulb part not the whole thing.  Now this lights up at night, makes a great night light!


Wednesday, August 26, 2015

I finished putting together another house


This is one of the pictures I took when I was putting the walls together.  You have to make sure you read the directions before putting anything together.  The directions are sometimes hard to understand.  You have to make sure you put wax paper under it so the glue won't make a mess. Easy cleanup!


This is what the inside looked like.  The next photos you will see how it turned out.  It took me a week to put this one together.


This is a view of the inside.


The attic area I put in a bed, desk, dresser and an abc board.  The floor is made of a wooden placemat.


I tried to take a picture of this room but it came out dark.  I have a bed, nightstand, dresser, desk, chair a long mirror in this room.  The floor I put in this room was a wooden slat picture with an oriental picture on it.


The kitchen area has a table, chairs, stove and cabinet in it.


The parlour has a sofa and tv in it.


This is what the house turned out to look like.


Thursday, August 20, 2015

A bubblegum machine you can make for a dollhouse


This is the bubblegum machine that I made from different items in your home and dollar store.


These are the items you need for the machine.  From the top to bottom.  A cap from a Gatorade bottle, I used the cap from the larger bottle.  A piece of dowel approximately 3 inches long for the stand.  The top off an Ajax dish detergent bottle, you need the top off the small one not the large bottle.  A piece from a chess set, the pawn piece.  You can buy the whole small cheap plastic chess set from the dollar store.  The green cap is from a tropicana juice container.  You can also use the wheel out of an antiperspirant container for the smaller cap.  I made one with the wheel and one with the juice cap.  Either of them work.  Also a package of plastic favor pacifiers you find in the dollar store.


The first thing I did was use my wire cutters and cut the ring off the pacifier and took the bottom pink dome off the globe.  You can see in the picture a pacifier and one that I took apart. The dome part try to sand down the sharp ridges so its some what flat.  


Now take the Gatorade top and hot glue the dowel on top of it.  You might want to sand down the top of the dowel so it's flat and easier to glue on the cap.


Next take the dome from the pacifier and glue it dome side down on the top of the dowel.


Then hot glue the smaller cap from the juice container on top of the dome piece.  Make sure the flat part of the cap is down on the dome.  You need the open cap top for your bubble.


This is the dish detergent cap part, I cut off around the circle on top to make it smaller.


In this picture you can see the cap again.  If you notice some white marks on the right side of the cap I need to cut this part down some to make it smaller.


Now you can see what the cap looks like, I also made a little cut out round area which will fit onto the side of the cap which you will see.


Next hot glue the cap on the side of the green juice cap.  This is where the gum would come out.  Time for spray painting the base.  I picked the color black so it would look like cast iron.  You could paint it copper or any color you wish.


Here it is spray painted.


You will need some beads for bubble gum.  Cut the beads apart for gum.


Next make sure you put a little hot glue on the bubble frame and put both sides together.  Add the bubblegum beads.  I like to fill mine part way so it looks like some were eaten already.


Hot glue the bubble on top of the base.


Last add a piece which you will cut off the pawn piece to the top.  Now your finished!  You could also add some little items on the inside of the bubblegum machine for prizes if you want.  Use you imagination.  Don't throw out the piece you cut off the pawn they can be used for legs on a dollhouse bed which I will show you in another blog.


Monday, August 17, 2015

Pictures of the rooms in the dollhouse with different curtains installed


A large broken popcorn machine turned into a beautiful piece


This is what the popcorn machine looked like when I took it off the garbage.  I took the whole thing apart and scrubbed the pieces Down.  Next pictures you will see what it looks like now.


This is what it looks like now.  I spray painted it gold and black.  I added fake flowers, angel statue, two feather angels.  Of course I also added solar light fixtures.  The top I used a coach light that I bolted to the top with a statue in it and a solar light. On the inside you will see two solar light fixtures I made.


This is a close up.


Another close up.


This is one of two stands I bought at a garage sale this weekend.  I will be adding some solar lights to the top, I already painted both of them red.  They are both going on both sides of the popcorn machine project.