Ad sense auto

Google analytics

Monday, December 31, 2018

Making a sign for in a dollhouse bathroom

In this picture you can see a picture that I cut out of a magazine and I cut a piece of wood the size that I needed for it.  You could use one of the free paint sticks you get in the store that sells paints.  After I cut the piece I took a piece of sandpaper and rounded the edges.
 I then painted the wood pink and used my fingers to take off the extra paint.  In this picture you can see the mod podge which I am using for gluing the picture on and sealing it.
 In this picture you can see I glued on the picture, but I wanted it to look old so I used dark brown paint that I watered down.  But before aging it with the brown paint I paint in the designs on want on it I used gold and blue paint. I then painted on mod podge to seal everything after the paint was applied and dry.  I like using my fingers to smear on the mod podge but be fast you don’t want your fingers to stick to the picture.
 In this picture you can see I glued on a bow on top.  Now this is ready to put in my dollhouse unless you decide that you want to add a small chain or hanging thing to the back, I am just gluing it on the wall.  Magazines are the best!
These are the supplies I used to create this project.

As an Amazon Associate I earn from qualifying purchases.

Making an old looking bed for a dollhouse from coasters

In this picture you can see the two coasters I cut down to make a headboard and footboard.  I also used wood from a closet door which are the slats of wood that always fall out.  You know which doors I’m talking about they never stay together, if you see them on the garbage take them home those slats of wood are great for making items.  I made the two frame slats for the sides of the bed and also cut two pieces to glue on the side slats that the mattress is going to sit on.

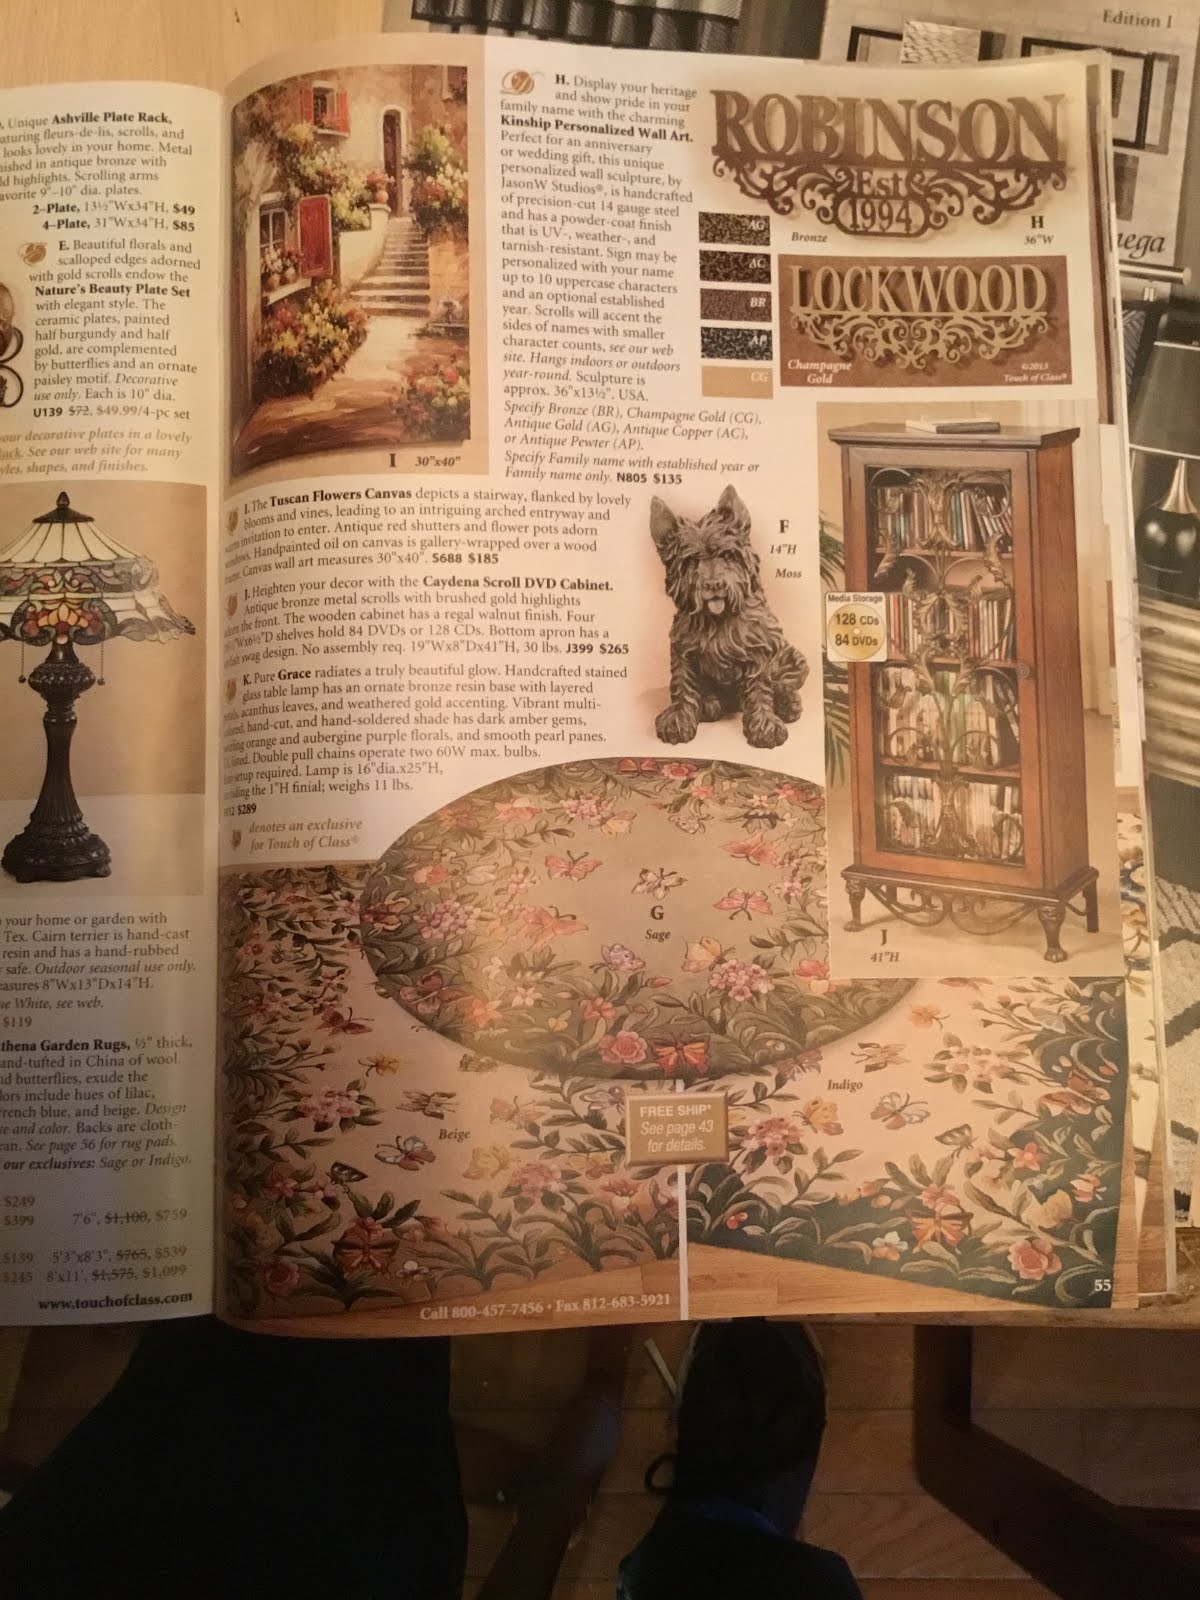
If you have magazines you can find beautiful pictures to mod podge on the wood, I used this magazine for pictures. They have beautiful items.


Here’s the pictures I found for the bed the two angels for the headboard and a sleeping angel for the footboard. I also spotted a powder room sign that I’m going to use to make a plaque for the little bathroom in the dollhouse.  I’ll post that also when I do it.
In this picture you can see I glued on the side rails, I made sure to measure the length using one of the small dolls.

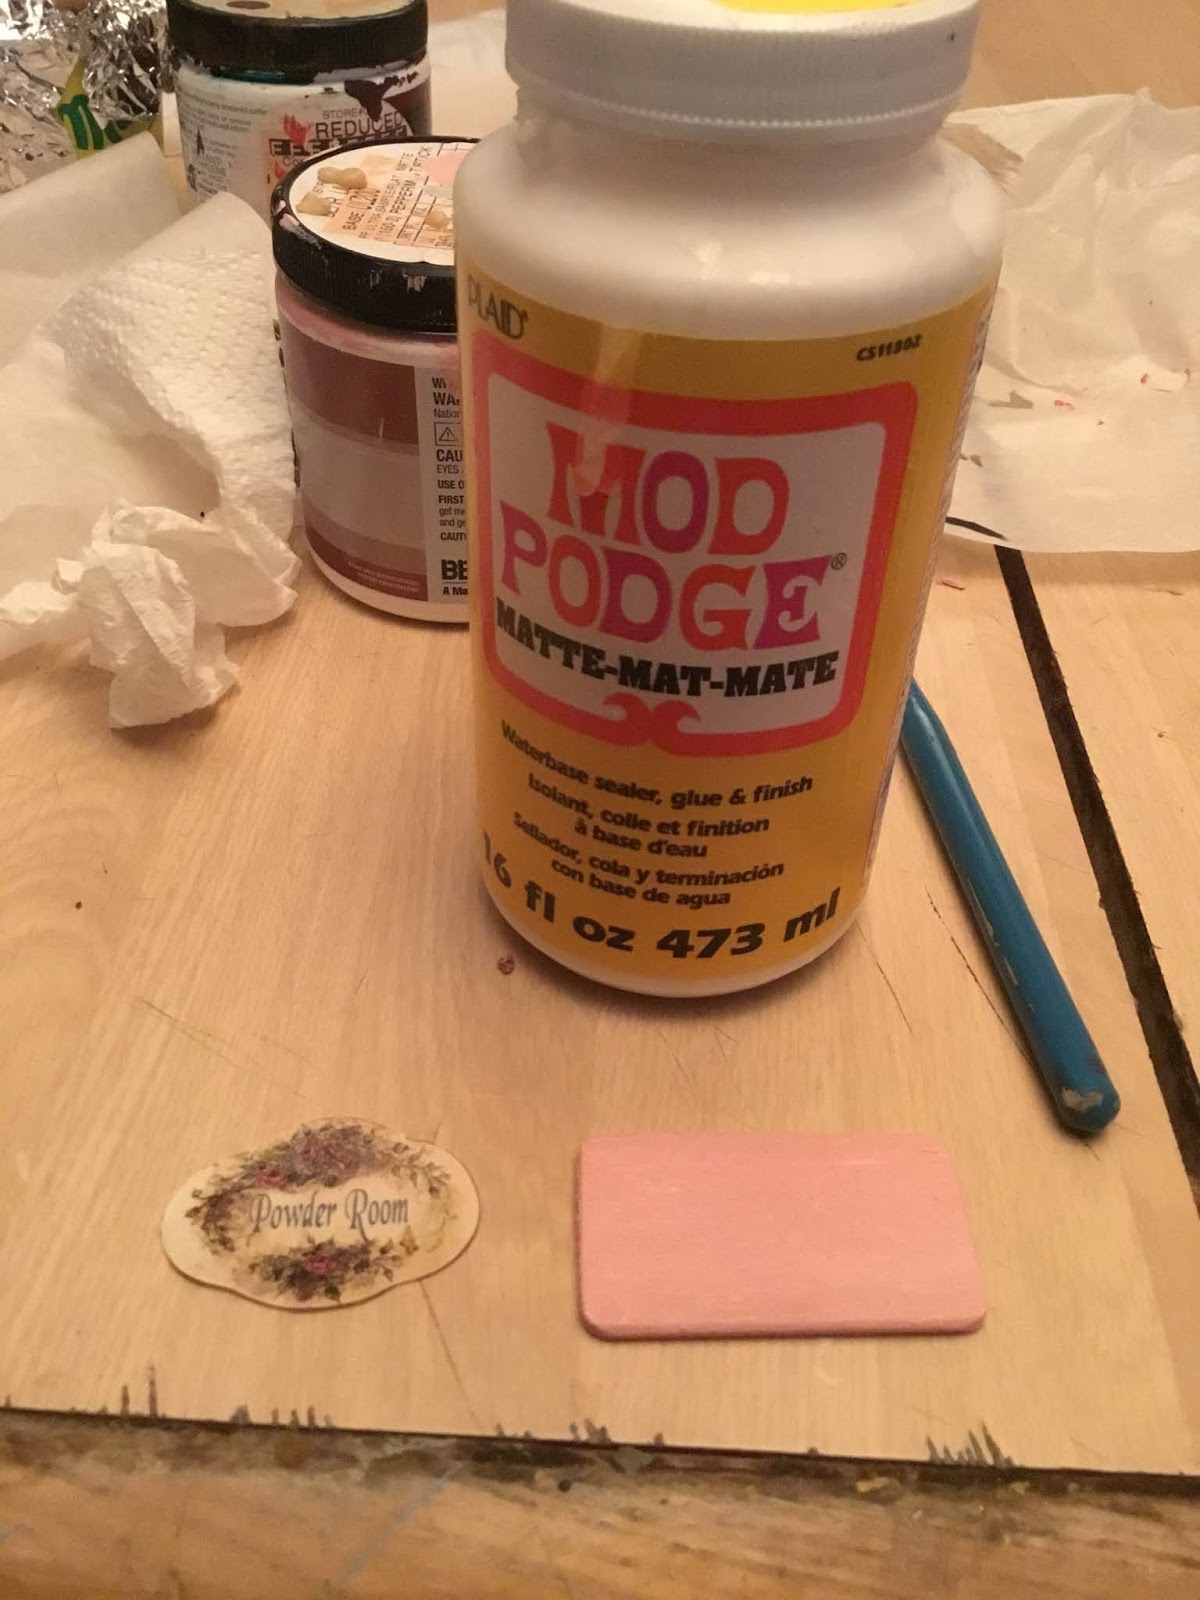
This is the glue I used, I mix flour with wood glue to make a great glue.  Once this dries it’s as hard as a rock, it’s also good for filling cracks and also fixing outdoor statues, who knew right?
In this picture I glued on the little long pieces of slats onto the larger ones to hold up the mattress.  These clamps I buy at a flea market they are cheap and great for small projects.
In this picture you can see I mod podged on the pictures.


Once I mod podged them on I brush the whole area over the picture and the wood with mod podge to seal it.  Then I take watered down brown paint and use my finger to put a little over the area to give it an aged look I also put some watered down black paint on just the wood not over the pictures.  I use my finger to take some off too.

You can see I also use folk art #577 metallic Sahara gold paint to make some detailing on it.  Older furniture always has some gold detailing on it.


Another picture that you can see the detailing.
These are the paints I used.
I love making my own mattresses.  I use a piece of cardboard cut down to the size I need to fit the inside but I cut it a little smaller once you add the stuffing on top and than the material it takes up space.  First the cardboard then on top of that I hot glue down a piece of the material that is used to make square pillows, this material is thick so I pull it apart in the middle to make two pieces of it and use one piece.  Then I use a mattress cover material to wrap around the top around to the underside hot gluing it down as I put it on.  Then it gets glued down onto the two boards on the inside wall of the frame.  Make sure you check the fit of it before gluing it down.  Remember to cut the cardboard smaller in the beginning or you will find it’s to big to fit on the inside once your done.

These are the supplies that I used to create this project.
As an Amazon Associate I earn from qualifying purchases 


Making a bed for a Dollhouse


I’m using this piece of plastic type material that came from something that was taken apart.  I cut the piece in half and made a size for a headboard and footboard.  I have material which you see in the picture I am also using some of the hard stuffing type material you use for making a square pillows and a piece of cardboard.

I took the cardboard and cut out pieces to glue onto the backs so you can’t see the inside of the back area.


After taking a piece of cardboard that I cut to fit the front areas of the beds footboard and foot board.  I put some of the pillow stuffing which you use to make a pillow cut to the sizes to cover the pieces of cardboard that I cut and glued them on then I covered both pieces with my material.
This is what the backs looked like.
Then I glued the pieces onto the plastic headboard and footboard. The side pieces are two pieces of wood cut for the side railings to hold the bed together, I also cut two more pieces of wood and glued them on the inside of the railings these boards will hold up the mattress.


I then needed a mattress, so I cut a piece of cardboard smaller than I needed so I could add some of the pillow stuff on it and covered it with a mattress cover material.
Here is what the bed looks like.  The only thing I need next is a pillow and blanket.


Sunday, December 30, 2018

Making a bed for a dollhouse using coasters

These are the coasters I’m using I cut one shorter than the other, one for headboard one for foot board.  I cut two pieces of wood for the railings down the sides that connect the coasters together.  Also two pieces that get glued to the railing that hold up the mattress.

This is a picture of the railings glued on and the boards that hold up the mattress.


These are the pieces that I make mattresses out of.  A piece of cardboard and I glue on a piece of the material you make a pillow out of and then on top of that I wrap around a piece of a mattress cover material.


This is what the mattress looks like when all the pieces are glued on the cardboard.


In this picture you can see the bed with the mattress glued down to the boards that are on the bed that hold up the mattress.  I also added the two earrings one on the headboard and one on the inside of the headboard.  I also glued on two small bows.


Here’s a look at the footboard with the earring on it.


All this bed needs now is a bedspread and pillow and some beads for the legs if you want to add them on.

Thursday, December 27, 2018

Other ways to use the wood from a frozen castle


I used two pieces off the frozen castle that had windows in these areas for a background in the attic area in a dollhouse. I also put a border on the back wall under the wood from the castle that had a scenery so you would see it through the windows.

In this picture you can see different pieces of the frozen castle that I used in the attic in another dollhouse I did.  The next pictures will show better views of this area.

I also put some white batting material on the ceiling to make it look like the inside of the frozen castle.

In these two pictures you can also see how the wood from the frozen castle was used for the floor, back wall has the window from the castle which I glued right over the attic window.  The piece in the front was cut so it can also be taken off for playtime if needed. You can get some nice decorative windows, walls and flooring from a frozen castle.  This wood is very sturdy.


Using a coin holder for a picture frame for a dollhouse


This is the coin holder you would need to use.


This is what it looks like when you open it up.  Now you are going to add a beautiful picture to the inside, make sure the picture is the same size as the cardboard coin holder that is in the case.


I like to look through magazines for a nice picture.


These are the pictures that I chose for the dollhouse.  I also painted around the edges of the holder to make it look like a frame.


Fixing a collector Necco Gremlin, made of a heavy resin type material

The gremlin can be seen in this photo.  Both arms were broken off, the right ear was broken off the spike on the back of it was cracked on the bottom area and was about to fall off.  There were also large chunks missing out of it. You can see the one arm in this photo. The back of both knees had cracks that needed to be repaired also.      


In this picture you can see the other arm that was broken off and large chunks that were missing.

In this photo this is one of the ears that was broken off.  In a moment I will tell you what I used for the glue, not something that you pay a lot of money for but something different.
     
Here’s what the one arm looked like when I glued it together.  You can see a chunk missing out of the arm on top.

 
In this photo you can see both the arms had the chunks that were missing filled and also glued together.

In this picture you can see the spike is cracked.

In this picture you can see where i repaired the spike. 
This is the back of the gremlin once the repairs with the glue were made.

This is a side view.

This is the finished statue after it was painted with paint to match.  The glue that i used was wood glue mixed with flour, yes flour.  Strange combination but first you put wood glue into a throw away type plastic cup ( i use yogurt cups) and add enough flour to make a thick consistancy if you add to much flour add some more wood glue stir with a popsicle stick.  You will use this to fill cracks and to glue pieces together.  For the areas that have large chunks missing first you fill the hole with the same stuffing material you use for filling a pillow then you put this mixture over top of the hole and smooth out with a popsicle stick, sometimes i will use my finger, this mixture can be scrubbed off your hands with a scrub sponge thats what i use As it sets it smoothes out itself.  This can also be used for outside statues made of a resin material.  When it sets it will be as hard as a rock.  There were only 500 of these statues made, it was truly a piece to fix and not discard.  Why throw out a statue when you can fix it and make it appear new again.  Gizmo has his friend back again!


Making a fake stained glass window for a dollhouse

The first thing I do is look for a design that I want in my stained glass window, while sitting at
my table i noticed this flower in the tablecloth and this is what I wanted as the design.  The next thing I do is take the window that goes with the dollhouse or I make a window out of plastic from a cover for a folder, you will see that in the photos. But in this case I had the window.  I then lay the window over the design I want and useva paint pen to trace the pattern.  After doing that if it is still not dark enough I use black paint with a tiny bristle paint brush to go over the design I drew again.  
 

I then take out nailpolish colors and start filling the design like coloring in the lines when coloring a coloring book.  After im finished coloring it in and it dries its ready for installing.  You will see how beautiful this turns out and think of the designs you can make.  I even use this technique for making older looking windows which you can also see in one of the photos.  Have fun use your imagination. Also make sure the nice side faces outward on your house.