Ad sense auto

Google analytics

Tuesday, November 3, 2015

How to make wainscoting for a dollhouse


I bought these at a garage sale but you can buy them in a craft store.  This is one of the items I used.


As you can see in the photo I taped a stack of these door hangers together.  I'm getting ready to cut them down.  You can see the line I drew on the top one.


These are the size that the pieces are after cutting them down.


Next I tapped them together and cut them length ways.


All you need to do now is measure each piece to the length you need them to be in each area of the bottom of the walls.  Then add Popsicle sticks around the wood and down the center to look like wainscoting.  In the picture you can see the pieces on the bottom of the walls.


This is another view.


Here's another view.  I painted them off white.  The top half of the wall is scrap booking paper it makes great wallpaper and you get a lot more choices.  You can also use these for shutters on a window.


This is what the inside of the dollhouse looks like.


Monday, November 2, 2015

A beautiful Victorian dollhouse I just finished


This is the dollhouse that needed some work.


This is what the inside looked like.


You can see in this photo I changed the color to green, red and white.


This is what the inside looks like now.  My next blog I will show you the wainescoating I made for the second floor bedroom out of wooden door hangers and Popsicle sticks.


Wednesday, October 28, 2015

Old clock frame turned into a beautiful princess scenery, solar light.


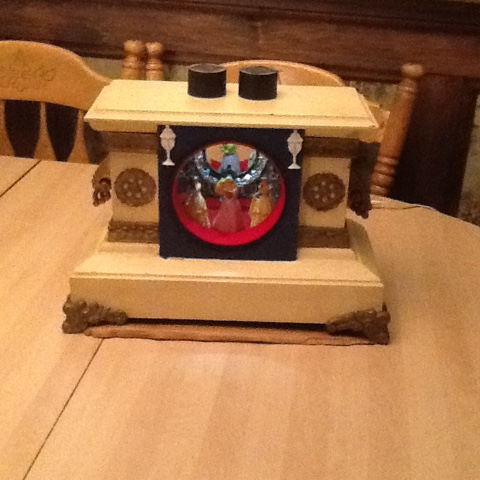
I finally finished the clock frame I was working on.  This clock had no insides so now it is a beautiful parlour scenery with princesses.


Just to remind everyone what I started off with.


This was the inside back area.  I needed to rebuild a back and a floor.


I painted around the opening with black and blue colors.  I also added red felt around the inside of the circle area.  I also added two little lamp stickers that are 3D.  On the inside floor that I had to build with new wood I added some red felt.


I also added scrap book paper to the walls to look like wallpaper.  This is what the inside looked like at this point.


I then glued down 3 princesses, 3 chairs in back of them, a little organ on the left and small couch on the right side.  I also glued a picture on the two side walls of the parlour.  You can see the red felt on the floor.


Here is another view of the inside.


This is a view of the other side.


I then took the piece of wood for the back wall that I made out of wood and glued on wallpaper, a metal coaster in the middle that looks like a mirror, and two pictures one on each side of the mirror.  Now to put the back on.


Now this is what the back looks like.  You can also see the two solar lights on top.  I drilled two holes on top for the solar lights.


Here is what the beautiful solar light fixture looks like.


This is another view.


Here's another view.


Here's what the side looks like.  Just because an old clock has no insides don't think it's garbage turn it into a beautiful scenery piece.  The options are endless, it makes a great night light.  You can display anything inside and add light!


A winter themed solar light fixture, Disney


I used a candle holder and put in a winter theme.  I put white batting on the bottom to look like snow.  I then added a small house on the left side.  But before I put anything in it I glued down bamboo slats on the back wall which was once a bamboo placemat.  I then glued some glitter looking ornaments to the back wall.  On the right side of the house is a tree I glued down.  I also put some batting on the roof of the house.  I added a snowman which is made from cotton balls.  I took a toothpick and cut pieces off it for the snowmans arms.  You will also see some Disney figurines that I put inside it.  I sprinkled some crystal looking glitter on the inside so it sparkles when the solar light is lit.


Here is another view of the item.


This is with the door shut.  It throws off a beautiful light around the fixture.


You can see goofy on the roof.


Thursday, October 15, 2015

A solar light fixture for the cartoon movie UP


I started off with a plastic jar that held small pretzels and an antique lamp.  As you can see in the picture I took the plastic jar and drilled a hole in the bottom and attached it to the lamp base.


I then cut around the top of the plastic jar to give me a bigger opening so I could fit the house into it.  Before putting in the house I glued in a piece of indoor outdoor type rug that is green and looks like grass.


I then made some balloons out of pipe cleaners with Pom Poms on top of them.


I then attached the pipe cleaners on top of the house with hot glue.


This is a piece off a hanging lamp which I painted blue with white specs.  I need this for the top.


This is a top off a container.  I cut a hole out of the top for the solar light.


I installed the plastic blue canister top on first then the hanging lamp piece.  The solar light gets put right into the hole on top.  This makes a nice night light.


Monday, October 12, 2015

Beauty from beauty and the beast solar light fixture


I bought this from a garage sale this weekend.  I know it may look really bad right now but wait until you see what you can do with it.  


The background is a napkin, I glued it on on the inside with mod podge.  I added some red felt to the bottom, some fake yellow flowers and glued down Beauty.  I also used some red electrical tape to highlight the napkin.  I also added to the bottom which beauty is on a piece from a toy.  Also some yellow lace to the top.


This lights up with a solar light which you can see it on top to the right.  I had to drill a hole in the top of the dome for the light.


This is what it looks like hanging in the garden.  Makes a great light at night!  Don't ever judge an item by what it looks like when you see it as it can turn into a real beauty!  Keep your eyes open on my blogs I bought a wooden item that used to be an antique clock, it had no mechanisms either but wait until you see what you can do with a little imagination.


Sunday, October 11, 2015

Indian scenery with solar light old oil lamp used


The bottom of this I used an old oil lamp, installed on the oil lamp is a round plastic container.  On the inside is an Indian family with a wooden looking teepee, shrubs, an Indian baby, some fake flowers.  I drilled a hole through the bottom of the plastic container and ran a threaded bar through the lamp on the bottom and into the plastic container.  I drilled a hole through the top of the cap on top and installed a solar light.


This is a closeup of the inside.  I also added some brown sand on the inside of the container to look like dirt.


This is another close up. I also glued on some red beads for decoration.


Saturday, October 10, 2015

A Star Wars solar light fixture


I just picked up this hamster ball at a garage sale today, I knew what I could use it for!  Next to it you will see a candle stick that I will be gluing the hampster ball to.


Here's what it looks like glued down to the candle stick holder.


I made sure the opening of the ball was on top.  I then glued down a piece of red felt to the bottom to give it some color and a base.


Here are some Star Wars pieces I bought at another garage sale a while ago.  I decided to use some of these items for inside the ball.  I glued six of the Star Wars characters to the inside of the animal looking vehicle.


On the inside I glued down the characters and added some sparkled stickers on the outside of the ball.  On the top I drilled a hole in the lid of the ball and added a 97 cent solar light top which I purchased at Walmart.


I wish you could see this lit up.  I also added a couple strings of decorative silver beads.  Use your imagination and go for it!  It makes a great night light for a Star Wars lover.