Ad sense auto

Google analytics

Monday, October 17, 2016

Beds for old house made from wood coaster and wood frame


These are the wood frames you will need to make beds for your dollhouse.


These are the wooden type coasters.


First thing is to apply any type of picture onto the coaster on the side that does not have the cork.  These pictures I got off the back of outdated calendars.  On the backs of calendars they have displayed in minature size the pictures that are for each month.  I love using these pictures for my projects.  You can also frame these pictures for your dollhouses.  I use popsiclesticks to make frames.


Next glue the coaster to the wood frame for a headboard.


This is what the back of the headboard will look like.


Next you will need a mattress for the bed. You need a piece of cardboard and a piece of felt.  Cut the cardboard to the size you will need and hot glue the felt to it.


This is what it will look like when you glue them together.  In this picture You will see the front and back.


The next thing is to glue the covered cardboard onto the wood frame.


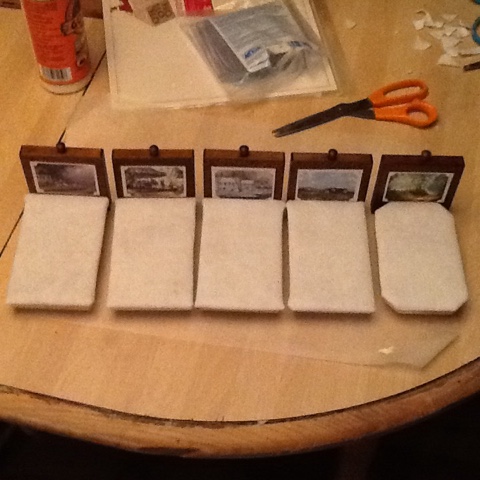
On the underside of the bed you need to glue some wooden beads for the legs of the bed.


This is what the beds looked like, now all I need is blankets and pillows.


I like to make the matching pillows and blankets and curtains from material table cloths.  I cut them up as you will see.


What doll wouldn't want to cuddle up in this bed?  There are many types of material be creative!  Make it unique.


Wednesday, October 12, 2016

Make a minature lamp for a dollhouse with a toothpaste tube


I needed to make a lamp today for a dollhouse. I used a toothpaste cap and the area that the cap goes on. I first take the part that the cap screws on and cut it off, this will be the base of my lamp. The cap on top which is blue gets glued onto the base as you can see in the photos. You might want to spray paint the base before gluing them together. I like the brass look on this lamp. Next take a piece of material you will be making slits on the bottom edges so it fits nicely. the top area of the material I also make slits so I can fold the material to the inside of the cap, make sure you glue it down to the inside. I also used a juice container ring and the stopper to cover the top opening where the material was glued down into the top area. I spray painted the stopper gold the ring I left white. The ring I glued on the top to make it look decorative and also added beads to the top. You can use beads, lace anything to make it decorative.


Here is the toothpaste container


Here's the toothpaste I used it off of.


On top is the cap, the bottom is the part that the cap screws on to. I spray painted the bottom part before gluing them together.


This is the material with the slits on the bottom.


This is the bottom glued down and slits in the top area that gets glued to the inside of the cap.


In this picture you can see the little stopper that I painted gold and glued it down to hide the material that has been glued down to the inside.


Another view of the top area.


Here is a picture of the juice container piece I cut for the two pieces.


I also added beads to the top.


The finished lamp.  I hope this gives you some ideas.


Monday, October 3, 2016

I needed a floor for the kitchen I used a plastic bag from the store Target


This is a target bag they have rows of red dots on them


You will need a piece of cardboard for the base of the floor.


I used a cardboard box bottom that paper came in.  I assembled the strips of the Target bags and used mod podge to glue the down to the cardboard.


I then cut the piece down to the size of the kitchen floor


I glued the cardboard down to the floor with wood glue.  Think of what other plastic bags you could use for flooring and murals.  I put a layer of mod podge on top f the floor to make it shiny.


A dollhouse I'm working on right now


On the ceiling I put a mural. The picture is from a calender, I framed it with large Popsicle sticks. The toilet seat is made from a facial type tube. The toilet tank is my vanilla extract bottle, which was cut in half I used the bottom of the bottle which I turned upside down. The toilet seat is glued on to half of a plastic soap dish top (which I bought from the dollar store).  I used Popsicle sticks to frame around the toilet base and the underside of the whole thing.  Looks like someone left the door open there goes the toilet paper again!


In this picture you can see items that I wrote about. But in the picture is the top of the vanilla extract bottle, I used the bottom. Keep watching my blog the top of the bottle I will be turning into a clock for this dollhouse.


I glued them together with a hot glue gun.


Here is a view of the underside.


Here's a side view.


I also cut a piece of green foam for a toilet seat, for those who like soft seats.


Here's another view.  I also added a piece of blue foam board on the tank top.  You will also see some perfume bottles which are made from jewelry pieces.  You can use your imagination.


Another view of this room.


A toilet paper holder made from a plastic bird ladder for doll house


In this picture you can see what's left of a black plastic bird ladder, which I will be cutting off a piece for the holder.  You can also see some toilet paper, you will need more toilet paper and a piece of cardboard from a cereal box.  You will also need a cap off the top of some bottle.


In this picture you can see the toilet paper holder with toilet paper on it.  On the bottom is cap which I painted the top with green nail polish.  I put a slit into the cap and installed the piece I cut from the bird ladder.  I bend the edge up to hold the toilet paper on.  The cardboard from the cereal box I cut a strip and glued the ends together.  I then cut some toilet paper and wrapped it around the cardboard.  Make sure you glue the beginning of the toilet paper to the cardboard so it doesn't unravel.  When you finish rolling on toilet paper put alittle glue on it to hold it down into place.