Ad sense auto

Google analytics

Tuesday, April 29, 2014

Candle Stick solar light fixture, with an older glass globe, great for a power outage.


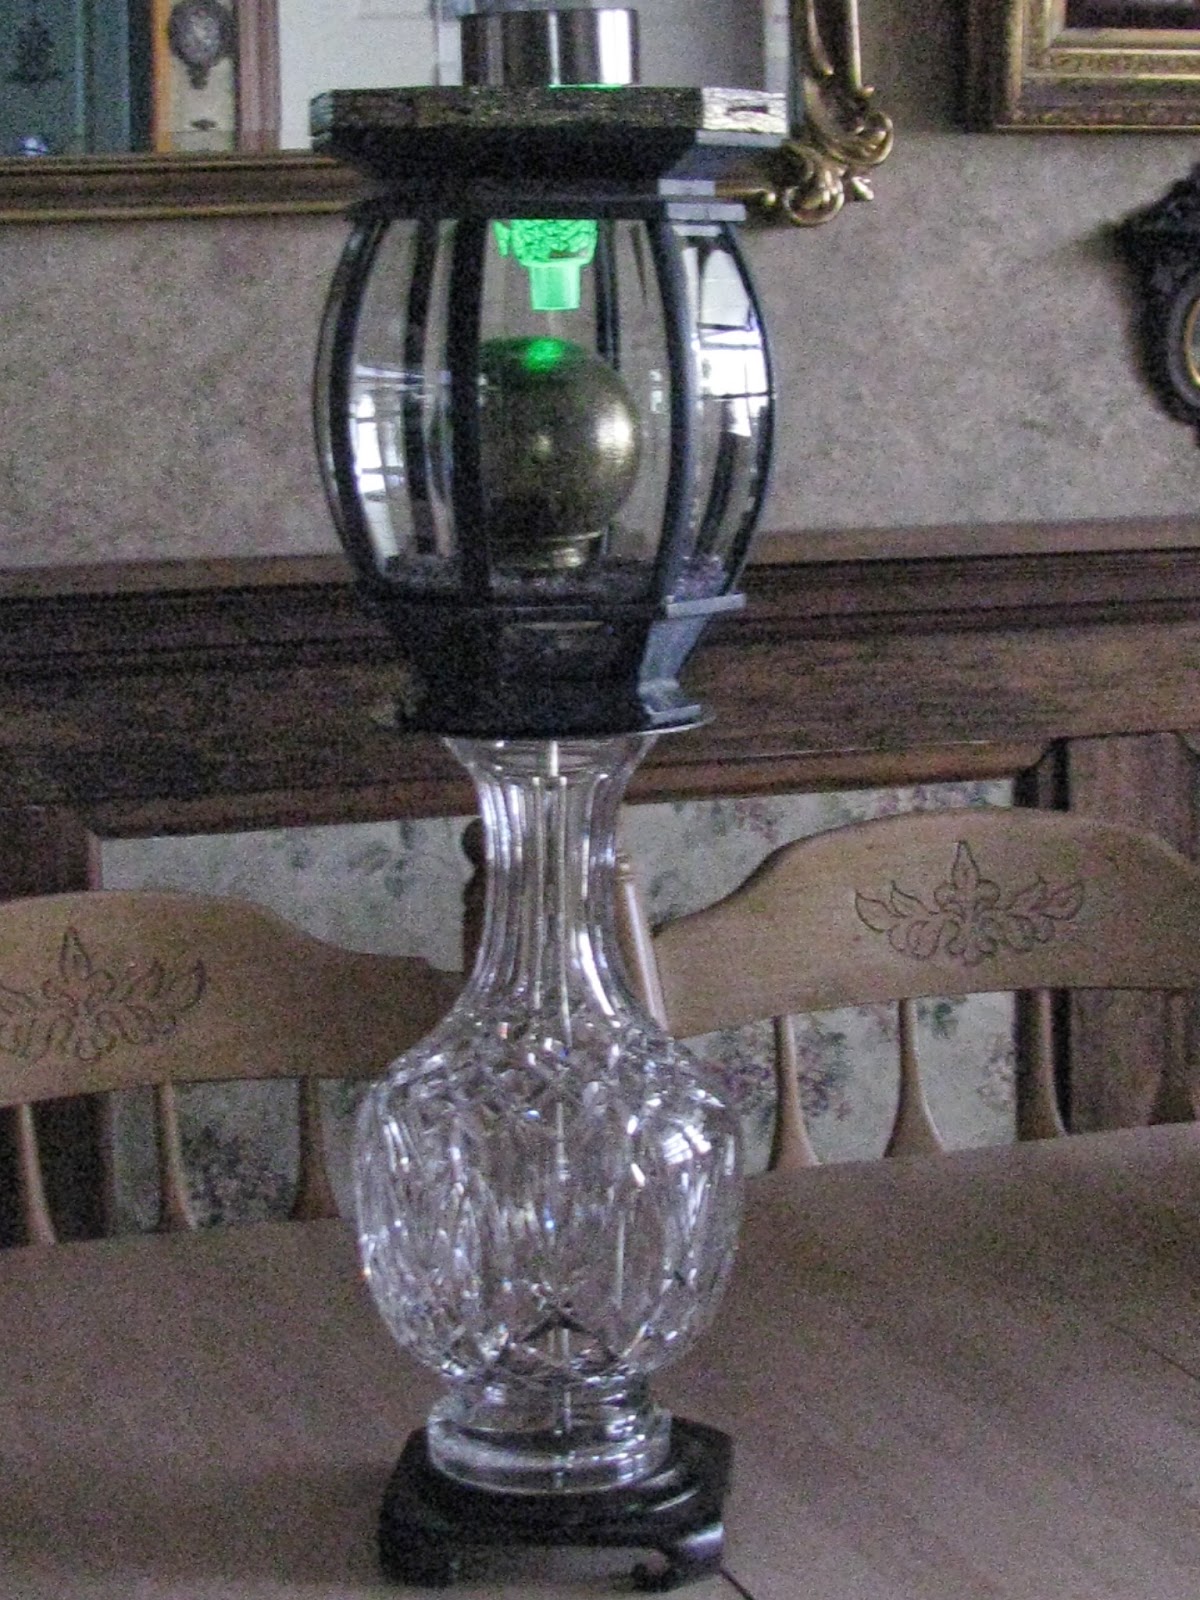
This is  a solar light I made from a candle stick holder which you can see on the bottom and also a light globe.  The light globe was turned upside down and installed to the top.  I took a piece that I had from one of my other projects and put it on top of the globe, the middle of this piece had a hole which I install the solar light into.  As you know light globes have a large opening on the bottom of the them which I needed the hole smaller to fit the solar light top.  I also added some red beads to give it a nice look.  I spray painted just the one piece that was put on the top.  The candle sticker holder is a green color and the top piece is spray painted black.  This looks beautiful when it lights up at night, and as you can see it makes a beautiful piece during the day.  When you see the older glass light fixture bulbs pick them up they still have a lot of use to them.  Remember when the electric goes out this can be used for light.  During an electrical outage in our neighborhood my lawn was the only light in the area.  At night these different lights look beautiful and they are all one of a kind.  Remember they also made solar lights that change colors, any solar light top can be used.


Monday, April 28, 2014

Antique coffee maker and an older outside lamp fixture which I will turn into a beautiful solar holder, also a figure from Rudolph the red nosed reindeer.


These are the two items I started this project with.  On the left is the older outdoor light fixture, on the right is an antique coffee maker with a marble base.  The first thing I did was take the coffee maker apart, I'm using the loop part and marble base for this project.


The first thing I did was drill four holes in the edge on the top of the light fixture and installed some chain which was from one of my other projects I took apart.  If you look on the marble base you will see I installed a round decorative mirror with the figure from Rudolph the red nosed reindeer.  On the very top of the lamp fixture you will see the top of a solar light that I used.  At night the lamp lights up and the light also comes down over the figure on the bottom.


This is a closer look of the top.


This is a closer look of the bottom.  This gives you an idea what you can do with an old rusted out coffee pot.  The coffee pot I will be using for another project.  Keep you eyes open on my blogs you will see the coffee pot show up.


Sunday, April 27, 2014

A beautiful mosaic color solar light installed into parts of a lamp


You will see in the bottom photo the lamp that I used for this project and in this photo on the left is the light globe I used.  This is what it looked like when I took the lamp apart and picked the pieces I wanted to work with.


After taking the parts off the lamp that I wanted to use this is the design I came out with, all the pieces are put together with a threaded bar and bolts.  I turned the light globe upside down and installed it in the top.


This is what it looked like after I painted it a hammered gold color.


After installing a top off a solar light in the top this is what it looked like when it lights at night.  The solar light I used had a cover of mosaic colors which you can see through the globe.


These are the parts I first started with, I decided not to use the piece that you can see in the middle.


Wednesday, April 16, 2014

2 different projects, Both made from lamps, One is a plant holder, the other is a solar light fixture.


This is the first project.  You can see the parts I am using for the first project.  On the left is a lamp which I will be taking all the electric out of and pulling it apart.  I will be using some of the pieces of this lamp for the project.  On the right is a glass off of another light fixture.  In the middle is another piece off another light fixture.


After taking the lamp apart.  I decided to add the glass piece on the top, you will see in the next photo what the inside looks like when I put the pieces all together.  This I am going to be using for a plant holder, I will be filling it with dirt and flowers.


This is what the inside top looks like.  It is all put together with the threaded bar which was already in the lamp.  Now on to the second project.


This is the two lamps I will be using for this project.  I will be taking out all the wiring first.  I'm using the threaded bar on the inside of the taller lamp it will hold it all together.


After putting both the pieces together, this is what it looks like.  On the top piece there are holes in it, when I add a solar light to the top of it the light will come through the holes in it.  There is pineapple on the front of this.  This will look nice outside or even in a front window of a home.  I hope you got some ideas from these two projects.


Saturday, April 12, 2014

Shopping Angel in an old outside light fixture. Solar powered light on top.


This is the lamp fixture I will be using which was once on a home.


These are the two shopping angel statues I have to choose from.  I picked the one on the right side with the phone in her ear and a bag in her hand.


The first thing I did was take the whole light fixture apart.  I then cleaned up the pieces and selected which ones I needed for this project.  I then painted all the pieces I was using a shiny blue color which you will see in the photos below.  I also cleaned the glass.


These are other pieces I decided to use in this project.  I hot glued the crystal ball on top of the candle holder.  This I used in back of the angel statue so it would put off pretty light on the inside at night time.  I decided not to use the heart pin on the bottom for this project.


This is some stiff felt which has sparkles on it.  I cut this to size to fit the bottom inside of the light fixture for a base for the angel statue.


this is a cheap key holder which I bought from a garage sale.  I just put some of this on the bottom red felt to give a little sparkle to the inside of the fixture.


In this photo you can see the color blue I painted this project.  Also on top is the top part of a solar light.  On the inside you can see the angel statue and in the back of her is the candle holder with the crystal ball on it.  I installed this lamp fixture on top of a PVC pipe which you will see in the next photos.


Here is a better close up of the side of this project.


You can see the PVC pipe that this fixture sits in to.  I hot glued them together.  However, you can use something stronger to hold it together.  I spray painted the PVC pipe blue also.  I hope this gives you some ideas.  This project is now in my garden for the spring and summer, in the winter I bring in all my solar lights and put them away in my greenhouse for the colder weather.  At night time this all lights up and having the crystal glass ball on the inside and the key holder it gives off a sparkle!


Wednesday, April 9, 2014

Lighthouse looking solar light made from an old lamp and a candle holder, gotta see this!


This is what I'm starting out with.  An old brass lamp and a candle holder on the right.  


This was an easy project.  All I did was take the top off the lamp so the long bar was out the top of the lamp.  On to the bar I installed the candle holder.  I had to drill a hole in the bottom  of the candle holder so I could put the bar through it and added a nut to put it all together.  I then added a solar light on top.  This lights up at night it looks great.  When you see this it looks like it was always together same color everything.  Use your imagination there are alot of things you can make into a solar light for outside or for in the house.


Tuesday, April 8, 2014

Making a beautiful plant holder out of a lamp and hanging basket. Solar light


This is one of those hanging baskets which you buy a liner for every year.  I don't need the chains so I'm taking them off and putting them away for another project.  I also cut off the x pieces on the bottom.


I'm also using these pieces from old lamps
 the small round pieces I decided not to use they were to small.


This is the lamp that I decided to use for this project.  I had two of these lamps so I made two of the exact items.  I'm going to show you what one of them turned out to look like.


This is what the project turned out to look like.  First of all you can see the lamp on the bottom.  This is a brass lamp.  On top of the lamp I added a piece of an old lamp which was round in shape to hold up the white basket.  On the inside I installed another round flat piece off a lamp.  I decided to use a bigger circle instead of the trophy circles to hold it better.  I used a nut and put it all together.  There was a piece of the bar still sticking out in the middle of the basket from the lamp so I added the whole solar light right over the bar.  I also added one of the liners that go in these type of planters.  I added some dirt, I will be adding flowers into it also.  The solar light I added changes color from red to blue to green.  This looks beautiful at night.  This would be a great piece for an entrance way.


Monday, April 7, 2014

An idea of a an older coach lantern and a glass lamp put together for a solar light fixture for the garden.


This is two pieces that I plan on putting together to make a beautiful solar light fixture.


I first took the two fixtures apart and took the pieces that I plan on using.  The piece of the lantern that I took off will show up in another blog keep your eyes on the blogs I put on.


This is a brass ball which has threads on the inside I'm using this piece to hold it all together.


I painted some of the pieces so they would all match in the colors I wanted.


If you look at this picture you will see I put the lantern on top of the glass lamp bottom and on the inside you will see that brass ball that I used for putting it all together.  However, on the top of the lantern there was an opening which I needed closed up.  So what I did was cut a piece of exterior thick plywood to an octagon shape and glued it to the top, I also drill a hole in the middle to fit my solar light.  The solar light I added changes colors from red to green to blue.


Here is what it looks like when the green color is on.  When it's outside it is more noticeable at night.


Here is what the top piece of plywood looks like after I painted it gold in color.  You can see the hole in the middle and also I added some gold trim around the plywood.


Here is a better look at the top.  I hope this gives you some ideas for what you can use an old coach light for and a lamp.