Ad sense auto

Google analytics

Showing posts with label Mod Podge. Show all posts

Tuesday, March 26, 2019

Making a nice shelf for your dollhouse


You will need to cut two pieces of wood, one for the back wall and one for the shelf.  The wood that I’m using came from a white wooden blind.  Just because the blind doesn’t work anymore doesn't mean you can't use the wood, you can use it for crafts.


I love this magazine, you can get so many pictures out of it. I’m going to cut some pictures out of this magazine.  Best of all the company will send you one of these catalogs for free all you need to do is ask for one. The request catalog button is just on the bottom of their site.


I saw this picture of pink flowers and thought, "I will use that".


In this picture you can see that using mod podge I glued the picture onto the back wall, then I used a black permanent marker to draw some black designs and a border around the picture.


Next thing you do is glue the shelf onto the back wall piece.


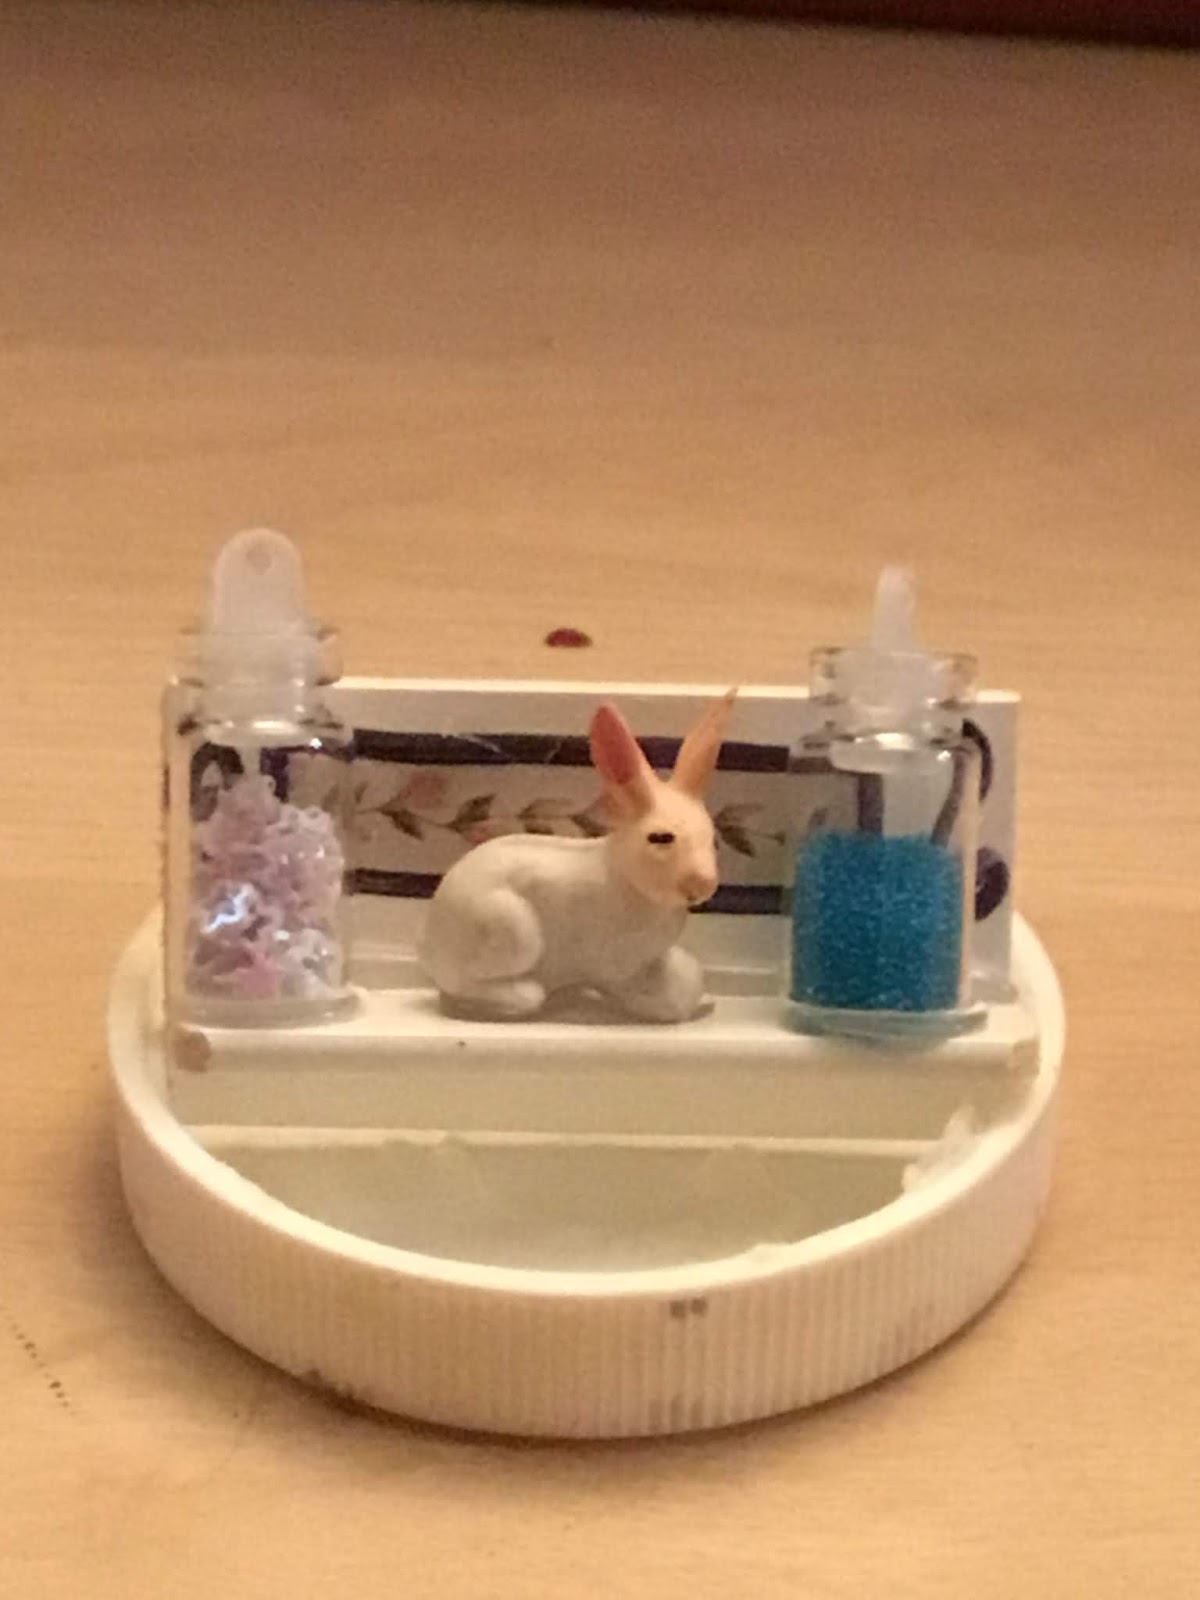
I glued on some small glass jars which you can find in the nail polish area of a store.  Inside the jars are sprinkles for your nails.  I also use these jars for making "spices" for in my dollhouses.  I have a post on how to make them in my blog too. In the middle is a small bunny glued down for Easter. 


Here is the shelf on the wall, I glued it to the wall.  The mirror above it used to be part of a cheap cameo necklace I took off the cameo, which I use for another project and use the back piece for a mirror.  Don’t pass up those cheap cameo necklaces, you can use them like this.  Use your imagination and it will soar!


Monday, March 25, 2019

Making a beautiful table for a dollhouse using Melissa and Doug wood container


My daughter bought something for her son, it came in this wooden crate.  She didn’t want to throw it out, she knew I could use it.  Well I needed a table for a dollhouse so here it goes.


The first thing you do is take out two rows of the wooden sticks on the sides, don’t take out the last row that is left for your table.


Here’s what it looks like after you take out the two rows of sticks.


You can put a border around the edge of the table, I used this. The next picture you see will be with this border on it.


In this picture you can see the border, which I glued into place around the table.


Here’s what the side looks like.


I wanted some decorative pieces on the legs so I used these ornaments which I got from Michael's craft store during Christmas time.  You can also find them sometimes at thrift stores and garage sales. I’m going to cut pieces off them.


You can see on the legs of the table the pieces that I used.


Another view.


After looking at the table, I decided to add some trim around the top where I glued on the other wood trim.  You can leave the trim on only or add some other trim to it.


At some dollar stores they sell plastic in rolls that have pictures on them, I bought 2 feet worth off the big roll.  Then I cut the pictures separately, this is one of the pieces I will be using this for the top of the table.


I then took some metallic gold paint and with my finger rubbed it all over the table top. Next is to glue on the plastic picture using mod podge.


Here it is with the plastic piece glued on with mod podge.  I know you can see the white glue under it but the best thing is, it dries clear.


I thought I would show you how beautiful it looks set up with items.


Here is the table inside the dining room in the dollhouse. The rug under the table is made from a placemat. You too can make a beautiful table with your imagination, and it will soar!


Tuesday, March 5, 2019

Making a beauty and the beast themed room in a dollhouse

If you look at this picture you can see the attic, the room is very blah.  I decided to make it a beauty and the beast room.


I printed these pictures off the internet under google searching painted mural ceilings.  I am going to paint the ceiling a dark purple color and glue these on both sides of the ceiling.


I also looked up stained glass windows for beauty and the beast. I printed out a lot of these. I'm using them for the back wall in the attic area you will see this in the pictures.


In this picture you can see the purple ceiling and the picture that I mod podged on the ceiling.  After the mod podge dried I put a coat of mod podge over top of the picture to seal it.  I also used some chess pieces for statues that I lined up going down the sides of the attic area.  In beauty and the beast beauty was looking at statues down the hallway on the way to her room.  I also looked up what the floor looked like in the movie and painted a little different floor like the one in the movie.


This is the attic on the other side of the room.  As you can see I did the same thing on this side.  I also added some figures.  The purple decorative looking fence is from a plastic barbie dollhouse that someone threw in the garbage.  Never turn your back on any type of dollhouse that is broken there are many pieces you can take apart and use.


If you look at the back wall you can see how I used the stained glass panels. I mod podged them on the back wall spaced like windows.  I painted with black paint triangle looking designs to give the panels a different look.  I also added a little statue of a castle by the back wall.  You can make any room in a dollhouse a theme.  Use your imagination and it will soar!


Thursday, February 21, 2019

How to make beautiful shutters for a dollhouse from a magazine


This is the magazine that I found a beautiful stained glass hanging piece.  You can get this catalog for free, you can go on their site and sign up for one, here. The request catalog option is on the bottom right of their page.


This is the item I found and made copies of from the magazine.


Next, I took thin pieces of wood and cut out pieces the same size as the pictures.  Then I used mod podge to glue the pictures onto the wood pieces.


This is the mod podge I used as well as the thin pieces of wood. You can also use cardboard if you don’t have some thin wood lying around.


This is what they look like once they are glued down onto the wood. I also put on a layer of mod podge over the picture to protect it.


You can see in this picture how beautiful these shutters look on both sides of the windows.  These pictures were out of the magazine.  There are many things in this magazine and other magazines that you can make copies of the pictures and use the pictures for making framed pictures for in a dollhouse, shutters etc.  use your imagination and it will soar!


Monday, February 18, 2019

Making perfume bottles for your dollhouse

I went to a flea market today and bought necklaces that also came with earrings, for a very good price and from a beautiful woman.  I love necklaces; you can get a lot of perfume bottles from a necklace. Here are the necklaces I used for this craft.


I had to print out some perfume labels off the internet so I have them for the perfume bottles.  You can look up labels on yahoo or google under images.


If you look at this picture you can see the beads I glued together to make the perfume bottles with E6000.  you can also see the labels I glued onto them with mod podge.


 I used poker chips for under the perfume bottles. I painted around the edges of them with gold.


Here is another close up.


And another..


And another...


Here is another closeup.  Use your imagination and different necklaces, and your imagination will soar!


Wednesday, January 23, 2019

How to make a refrigerator for a dollhouse


I used a wooden box for the refrigerator. You can usually find these at craft stores, or online.


This box I got in the craft store it opens a closes great for a refrigerator.


The first thing I did was paint the box the color I wanted the refrigerator to be, which was red.  I then downloaded pictures of the inside of a refrigerator and the outside of a red refrigerator.  I then mod podged the pictures on the areas that they were needed.


This is what the inside looks like. I painted the inside white.  I also added some shelves which were white wooden blinds that I cut up and glued to the inside.  I then added a couple grocery items.  Use your imagination and it will soar!


Friday, January 18, 2019

Making an Aladdin themed room for a dollhouse


 This is the Aladdin themed room, as you can see you can take a small area in an attic space in your dollhouse and turn your imagination into something unique for a child to love.
 For the inside area of the triangle on the wall where the window is, I used a paper napkin that had a design on it.  If you have decorative paper napkins you can use mod podge to put them on the walls.  I chose this design, it’s easier to match up and make everything look the way it does.  The area is a strange shape to work with. The wallpaper I chose is the pink one you see on the left in the picture, which I use tacky glue to glue it onto the walls.
 You can download all types of designs from the internet, I thought I'd use this one...
 I wanted to put in a long bench under the window area, so I measured the space and cut two different pieces of wood, one for the base and one for the top of the bench.  I glued them both together and added a piece of gold paper trim that you see in the picture to the front of the bench. I then added some half round glass jewels to the front.
 This is the wood with the gold trim on it.  >>-------->
 In this picture I am showing you pieces off a plastic dollhouse that I took apart. The mirror, the poles, the little jewel jar looking thing, the two blue cloud looking items. I put Aladdin in one and Jasmin in the other.  I also put red velvet material on the seat area under the window.
In this picture you can see spherical styrofoam purple balls at the bases of the columns. I also added a little flower arrangement. Just use your imagination, and it will soar!


Materials List:
  1. Tacky Glue
  2. Mod Podge
  3. Scrap Wood (For the Window Seat)
  4. Gold Paper Trim
  5. Half Round Glass Jewels
  6. Velvet (Like) Material
  7. Printer w/paper
  8. Scissors
  9. Decorative Paper Napkins


* As an Amazon Associate I earn on qualifying purchases (if you purchase directly from link).