Ad sense auto

Google analytics

Showing posts with label Wallpaper. Show all posts

Monday, February 25, 2019

How to make a miniature bookcase from an outlet cover

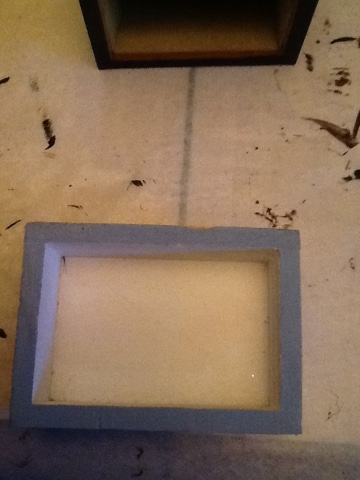
This is the outlet cover I’m using for this bookcase.  I take a screw driver, a small hammer and bang out the center part of this.  If it’s not a separate piece, cut out the center. You can also use a Dremel if you have one, it would make things much quicker.


In this picture you can see the center piece has been taken out.


In this picture you can see a white wooden slat from a window blind.  I got this blind at a garage sale cheap, I love using the wood.  I will be cutting pieces for the outer shell of the bookcase and the shelves themselves.


In this picture you can see the outside walls of the bookcase that I cut and glued into place.


Here you can see the shelves I cut out of the blind, and glued them in.


I cut a back wall for the bookcase and covered the wood with some wallpaper before gluing it to the back.


This is what the back looks like.  Now for decorating this bookcase.  Use you talents and imagination to make it a one of a kind and it will soar.


Friday, February 22, 2019

How to make playing card wallpaper for dollhouse

These are the playing cards I decided to use.


You can see in this photo that the playing cards are glued to the walls and popsicle sticks are used on the sides of the cards.  I also put popsicle sticks on the tops. You can use any playing cards. Use your imagination and it will soar!


Another view.


Friday, January 18, 2019

Making an Aladdin themed room for a dollhouse


 This is the Aladdin themed room, as you can see you can take a small area in an attic space in your dollhouse and turn your imagination into something unique for a child to love.
 For the inside area of the triangle on the wall where the window is, I used a paper napkin that had a design on it.  If you have decorative paper napkins you can use mod podge to put them on the walls.  I chose this design, it’s easier to match up and make everything look the way it does.  The area is a strange shape to work with. The wallpaper I chose is the pink one you see on the left in the picture, which I use tacky glue to glue it onto the walls.
 You can download all types of designs from the internet, I thought I'd use this one...
 I wanted to put in a long bench under the window area, so I measured the space and cut two different pieces of wood, one for the base and one for the top of the bench.  I glued them both together and added a piece of gold paper trim that you see in the picture to the front of the bench. I then added some half round glass jewels to the front.
 This is the wood with the gold trim on it.  >>-------->
 In this picture I am showing you pieces off a plastic dollhouse that I took apart. The mirror, the poles, the little jewel jar looking thing, the two blue cloud looking items. I put Aladdin in one and Jasmin in the other.  I also put red velvet material on the seat area under the window.
In this picture you can see spherical styrofoam purple balls at the bases of the columns. I also added a little flower arrangement. Just use your imagination, and it will soar!


Materials List:
  1. Tacky Glue
  2. Mod Podge
  3. Scrap Wood (For the Window Seat)
  4. Gold Paper Trim
  5. Half Round Glass Jewels
  6. Velvet (Like) Material
  7. Printer w/paper
  8. Scissors
  9. Decorative Paper Napkins


* As an Amazon Associate I earn on qualifying purchases (if you purchase directly from link).

Wednesday, March 21, 2018

How to make an entertainment center and a solar light tv for dollhouse


I use wooden jewelry boxes for the bookcases next to the entertainment center.  This is what I use for making bookcases also.  In this picture are two drawers out of a jewelry box.  I took off the pulls.


I use wallpaper or scrapbooking paper for wallpaper for the back wall.


I cut pieces of scrap wood for the size of the shelves for inside the bookcases.


In this picture you can see I covered the shelves tops with the same paper.  Now for gluing in the shelves I use tacky glue.


Here are the shelves in the bookcases, however I paint the bookcases the colors I want them to be before I glue in the shelves.


This is what it looks like after painting it and gluing in the shelves.


These are pieces off of a cheap elastic bracelet and little pieces off a chain belt.  I will be using them towards the end as you will see.


I also need this little box made of wood that will be turned into a tv.  This is the bottom of a wooden box that had hinges on it which they sell in the craft store.  I'm painting this black also to match.


This gives you an idea of what they all look like at this point.


I printed out a picture off the internet of the lion king for the screen of the tv.  I cut out this picture the size I need.


I then drilled a hole in the back of the wooden box this is where I will be putting the solar light top into.


This is the top of the solar light I need just the light part to fit through the hole.  I buy them from Walmart for 97 cents.


I glue the lion king picture over the opening area on the box.  I then need to put pieces of trim around the picture.


This is where I get thin wood trim from.  I find them all over you can see the small slats of wood.


This is what it looked like after pieces were glued together and trim around the picture screen.  I even put trim in the areas where the bookcases meet up with the tv, more finished look.


If you look on the top of the bookcases I glued on the pieces I showed you earlier from a cheap bracelet and a belt.  I also added a little decorative piece on top of the tv.  I buy these from flea markets in my area.


Here's a better look of the piece on top of the tv.


This is how it looks in the back, now to put in the solar light.  This solar light does not get glued in you need to recharge it with the sun in order for it to work.  I keep the whole light stake so I can stick it in the ground outside to charge it.


I tried to get a picture of it lit up on the tv screen, it looks nicer in person.  You can see what the doll is watching on tv.  You can also make a copy of a family picture on the copier and use that for in the tv so you child can see the family light up at night.


Here it is in the dollhouse.  Check out my other ideas for a dollhouse and use your imagination it can take you anywhere.