Ad sense auto

Google analytics

Tuesday, March 6, 2018

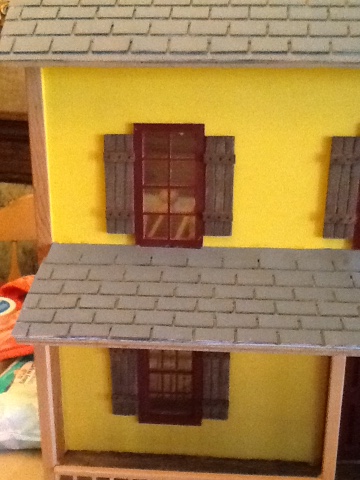
Making shutters for dollhouse that look old. Farmhouse style.


The first thing I did was cut down some strips of wood to the size I wanted my shutters to be.


I then took a pencil and made three lines going down the shutters.  I then took a small screwdriver and went down the lines digging out a groove with the screwdriver.


I then picked out a brown paint that I wanted to use.  I went with the darker shade. I painted all the shutters with the dark brown paint.  I than took a piece of sandpaper after they were dry and sanded them so they looked as if they were old and worn.


I used popsiclesticks to make two slates of wood across the shutter as you will see, but first I painted them to match.


In this picture you can see the shutters with the wood slates across the shutters.  I also used the end of the paint brush the handle end to make the nail heads on the cross boards.  I dipped the handle in black paint and just dotted the shutter boards.  Why buy items for your dollhouse when you can customize it yourself.


Making a roof for dollhouse out of poster board


This is the poster board I'm using for the roof, the other side has a color but I want a white roof.


I'm using one of the roof shingle strips that I kept from another project.  This is my template.


I traced around the roof template with a pencil.  You need to make as many of these that you need for the roof.  Make sure you also pencil the area of the slit areas that need to be cut out.


You also need some strips of the poster board which will be the first row.


In this picture you can see the strip on the bottom.  You can glue it on with tacky glue or wood glue.


Now you take one of the pieces of the shingles and glue it down on top of the strip.  Where the slits are cut out they should cover the white part of the strip.


The second row should overlap the first row of the shingles.  Make sure the lines that are cut out are staggered.


Another view.  Next picture you see will be the whole roof done.


I painted the roof shingles to look like slate ones.   Look at my next blog if you want to know how to make the shutters.


Saturday, December 30, 2017

What you can do with a large hole in the wall, make a memory.


My son accidentally fell through wall with his body going down into the basement.  In this picture you can see how big a space I had to work with.  I put some wood slats across the bottom from beam to beam, and also added a rug on top of it.  I then painted the interior walls and added wallpaper.  In the corner I added some corners pieces of wood to finish off the corner.


Here is another view of the hole.


I added a picture from a calender on the left side wall, you can see it in the picture.  I also glued some pictures on the walls of Disney characters, which I got off some boxes.  I also put a piece of a necklace on the wall that looks like a mirror once the cameo was removed. I also added some dollhouse furniture and accessories.


Another view.


I then got a piece of Sheetrock that would fit the opening and cut out spots for two windows and a door.  I know this might seem strange but I didn't have any speckle or tape so for the tape I used strips of papertowels, the spackle I used was a wood glue mixed with flour to make a heavy paste.  When this dries it is as hard as rock. I then took paint and mixed sand with it to make a textured paint. I painted the exterior a bluish gray color.


Another view.


I then added some wood trim around it, and a plastic material type roof to look like a clay roof which you can find in dollhouse supplies.  I added the front of a card to look like some scenery which you can see.  Over top of the door you will see a blue circle, this is a milk cap.  I bought a plastic letter from kohls that had a light on it.  This letter was a Christmas ornament for on a tree that could be battery operated and there is also a tester wire with a button on the end so you could see it lit.  I kept the tester line on it which had a push button on the end.  I cut a hole into the milk cap and put the button into it.  I then hot glued the milk cap over the door.  The light can not be seen. It is on the inside of the wall and is thumbtacked to the Sheetrock above the large window.  When you push the button and hold it down you can see the scenery better.


This is a photo of the inside when the button is being held Down.


Another view.


This is another view, while the button is pressed.


Another view.  Remember, don't get mad when a hole is made in the wall, make a memory.  Tell the children that little people moved in, they will love it!


Friday, March 17, 2017

Making a solar powered TV for a dollhouse out of a jewelry box drawer


In this picture you can see the drawer from a jewelry box and pieces from a picture frame.  I cut the frame to fit around the jewelry box drawer.


The first thing I did was print out a picture from a movie and gluing it to the top of the drawer.


I then glue the frame that I cut to fit the top of the drawer.


This is what it looks like from the bottom area.


In this picture you can see I painted the whole tv.  I made a tv antenna out of a piece of wood and toothpicks.  You can see it lit up.  The solar light can be seen lighting up the picture.  I drilled a hole in the back of the drawer and inserted a solar light


Here is what it looks like in the dollhouse.


Thursday, March 16, 2017

Making a fake stained glass window for a dollhouse


In this picture you can see a picture of a deer that I cut out of a magazine that I mod podged onto a piece of cardboard.  I connected a piece of a necklace chain to the cardboard with hot glue.


This is the other side of the cardboard which I glued on a picture of flowers.  I painted a black marking around the pictures on both sides.


This is a decorative piece off an earring, I also used a piece of the earring that goes through your ear.  They are both put together to use for the stained glass holder, the chain goes on the earring hook.  This gets glued onto the wall above the window.


Here's what it looked like when put in the window.


With the curtains up, this is what the stained glass window looks like.  Just think of the stained glass windows you could make for your dollhouse.


Thursday, December 29, 2016

Making a fake mirror with a seat for a dollhouse


The first thing I do is make a solid back and a frame for around the top portion.  I make the back longer so the seat can be glued onto it. I make them out of cardboard.


First take a container bottom from coffe cake and glue it to the top of the cardboard backing.  These will be the mirrors.


Next glue the frame on them.


You need to take two wood jenga blocks and glue them together, this will be the seats.


In this picture you will see I covered them with red felt and added lace to cover the seams. Next to glue the seats to the mirrors.


When they are glued together you have a hallway seat.  I also added a piece of jewelry to the bottom.


In this picture you can see them on both sides of the door. Next blog is how to make window shades.


How to make a fake stained glass window for a dollhouse.


First go on the Internet and print out a picture off images of a stained glass window you want to use.  As you can see I also made a frame for the window out of a pizza box.  I also take a piece of plastic from a container that held Danish.  I glued the picture onto the plastic with mod podge.  Just make sure the picture has the plastic glued to it. Now glue the frame over the plastic.


Now it is ready to glue to the window opening.


You can see the window with the picture in the center window.


Making Windows frames out of a pizza box for dollhouses


These are the Windows that needed window frames around them.


This is the cardboard from a pizza box.


This is a template I made off of one of the Windows.  I cut it out of a piece of cardboard.  Once you cut this template out keep it for making more of them.


This is cut from a pizza box.  I also added some plastic on it from a plastic carry home container.  I use plastic containers to make Windows.  I glue them together with tacky glue.


This is what they look like once they are all cut with plastics added.  Next blog will be how I made the stained glass window in the middle window.