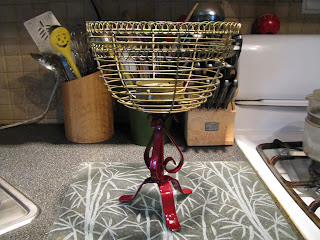
In this picture is one of the items I'm using for this project. This item had a metal handle on it for carrying the basket. I took the handle off which left me with this wire basket.
This is another item I will be using, this is a lamp. I took off all the electric and the item that held the light bulb which left me with the base of the lamp.
For the ones that have been following my blog, this is the round bottom I took off the candle holder for one of my earlier projects that I have listed on this site. I had to drill a hole in the middle of this cap, which is made of metal. Once the hole was drilled I turned it upside down and installed it. You will see in the following photos where it was installed.
First I took the heavy metal basket and placed it on top of the lamp base and put a washer on and bolted them down. I still had a piece of the threaded bar on top which I will need to hold the next piece that gets put on.
Now I took the metal cap which I had from one of the projects on my blogs and attached it on top of the threaded bar and bolted it down.
This is the pieces put all together. I then spray painted the top of it gold and the base a burgundy color. I always use exterior spray paint.
these are crystals that came as a chain of crystals that I bought from a garage sale years ago I knew someday I would use them for something. Today is the day!!
I took the crystals and split them into groups of three on the chains and hung them around the basket as you can see in the picture.
I also installed them around the basket letting them hang around the piece.
I then took one of those circles of flowers which go around candles. I cut off some of it so the circle would go around the metal cap.
In this picture you will see a crystal glass angel, in the back of the angel there is a place in which you put a candle in it. However, the size that they make the candle holders also are the same size of the solar light base as you will see in the next photos.
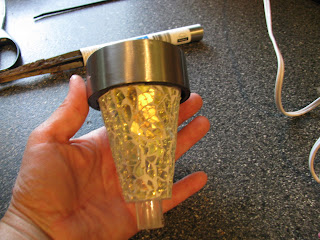
This is the solar light I will be using which I purchased from Walmart. This solar light actually changes color. You will see at the end of this project the different colors that this solar light puts off.
All I needed was the top part of the solar light not the stick part. All I did was take the stick off. I don't throw them out they can be used for other things.
I then installed the angel by hot gluing her to the top of the metal cap and also I hot glued the solar light into the candle holder area. This project I could glue the solar light in due to the fact that if I need to replace the batteries at any time. All I need to do is unscrew the silver part off the solar light so it doesn't matter if the rest of the light is glued down.
This is what it looks like with the angel and solar light installed. Also the fake flower in the bottom area.
I also glued on some fake flowers on the base just to make it different.
Here's what the finished project looks like, it might be hard to see the angel but at night it lights up in back of the angel different colors.
This is what it looks like when the red color is showing.
This is what it looks like with the blue color showing.
This is what it looks like with the green color showing.
This is a beautiful piece at night who wouldn't love having an angel that lights up in back three different colors when the sun goes down. Again you need to make sure the solar light gets enough sunlight so it will light at night,


No comments:
Post a Comment